Sunday 24 July 2016

Loving the land I live in

Yesterday I climbed to the top of our local hill - Bennachie (pronounced Ben-a-hee!)
This is not remarkable in itself but the land and the landscape are.  Though here in my home county of Aberdeenshire, we talk of climbing Bennachie, this is not one but a range of hills with several peaks.
Most prominent and rugged is Mither Tap with its iron age fort but Oxen Craig is higher.  Craigshannoch is the third peak with Millstone Hill an outlying spur.
Though not particularly high at 528m - Ben Nevis, Scotland's highest mountain is 1346m - the mountain is very prominent  and dominates the skyline.  The range of hills is isolated from other high ground and the surrounding land is relatively flat so Bennachie tends to dominate the skyline.
Here's how it looks from the village of Oldmeldrum.  Bennachie features on lots of local logos.
Climbing Bennachie is a favourite family outing - this was taken on Boxing Day 2006 when 9 relatives made it to the top with four of our neighbours. 
I created my own embroidered landscape from this photograph.  This became a present for my sister-in-law, Fiona, who grew up seeing Bennachie everyday but no longer lives nearby.
So it was a joy to climb to the top yesterday in the company of my daughter, Eilidh, who remarked what beautiful countryside we live in.  I couldn't agree more!

Share:

Sunday 17 July 2016

Giving Crosses a Big Tick

Late May and June were a bit quiet on the blog whilst I undertook my annual stint of full time work as an exam invigilator.  In fact, for the past six years I have been in charge of invigilation for the national exams at my local secondary school here in Aberdeenshire which means I work long days and put in many extra hours over the six weeks duration.

I deliberately planned a crochet project over the exam period which I could pick up easily every evening when I put my feet up.  I spend a lot of time at work on my feet!
So this is the thousand kisses shawl by Sam of the blog Betsy Makes.  Sam also records a video podcast which is one of many I enjoy whilst I'm busy making things.
The yarn I chose is Baby Alpaca Silk by Garnstudio Drops in the colours Pistachio, Wheat, Heather and Green. The cream yarn is pure alpaca from my friend's herd Mainsforth Alpacas.
The pattern is called The Thousand Kisses Shawl because the stitches cross over each other creating rows of 'x's.  As I was in exam mode, I was thinking more in terms of crosses then kisses (though I'm glad to say I don't so any marking!)
On a few occasions after school it was nice enough to sit outside and crochet.
 This must've been a Friday evening as I spy a G&T!
So happy with the result!


Share:

Friday 8 July 2016

Bye Baby - Bunting

It's my daughter's 18th birthday today.
I made her a card to celebrate all her birthdays as she is due to leave home soon to go to university.
The tags for each year can be detached from the accordion style card and are strung together so they form bunting. Added decorative loveliness!
Now, this is not my idea.  I saw a lovely card on the blog Jennifer Grace Creates which Jennifer designed for her sister's 21st birthday.  I thought it was a brilliant idea and was inspired to try to make my own.  Here's what I did.
First I assembled all the materials I needed: photos, blank cards, pre-cut tags, coloured card, string, glue, scissors double sided tape and my trusty guillotine.  For decoration I used a star punch, printed numbers and strips cut from wrapping paper.  I selected photos at home, saved them to a memory stick and printed them at as 2" x 3" mini-prints at the kiosk at my local Tesco supermarket.
 I glued the photos onto the tags.  I then glued the blank cards together, back to back, so there was a page for each year.  This also helped to strengthen the card booklet.
When I decided to add her age to each tag, I looked to the internet for some free printables.  These numbers were created for a design project to make your own advent calendar and come from the lifestyle blog by queen of organisation, Abby Lawson, called Justagirlandherblog.  I printed the numbers onto A5 paper so they were the right size for me.  Thanks, Abby, for sharing this really useful resource!
I then made a pocket for each page so the tags would fit into the card.  I cut these out of different coloured card (as the red, white and green was making it look a bit too Christmassy!).
The pockets are fixed to the card using double sided tape on three sides.  I found that the backing is sometimes hard to remove from the tape but tweezers helped!
Once the pockets were all fixed in, I decorated each one with a strip cut from wrapping paper and placed stars punched from the off-cut coloured card around the tags.
So far, so good but I realised that the card looked rather bare once the bunting is removed.  I typed up a few memories about each birthday, printed these onto paper and attached them behind the tags so they're only visible when the bunting is up.
I added my most recent photo to the front cover and attached a piece of string under it so the card can be closed.
The button on the back allows the string to fasten around the card.  I got my husband to write the personal message as he's good with words.
It only remained to string the tags together to make the bunting.
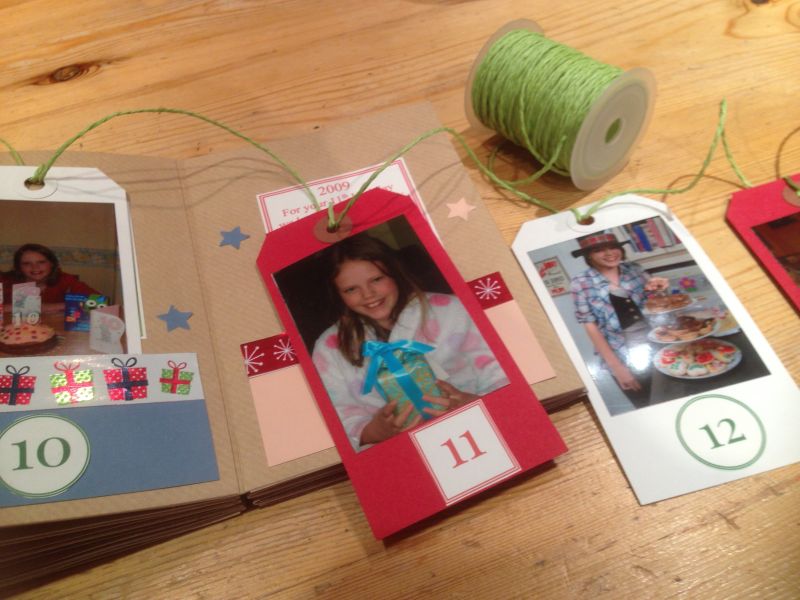
There you have it - a birthday card, party decoration and memory book all in one and I got to relive all these happy annual milestones whilst I was making it - and smile!

Share:
© Never At A Loose End | All rights reserved.
Blogger Template Designed by pipdig